In high-volume custom manufacturing, the gap between a stunning digital concept and a functional physical product is bridged by one critical technical file: the dieline. For brand managers and procurement buyers working with packaging manufacturers, understanding what a dieline is, why it matters, and how to use it correctly is not optional. It is the foundation of every successful custom packaging project.
Quick answer: A packaging dieline is a two-dimensional flat template showing the exact cut lines, fold lines, bleed areas, and safe zones of a box or packaging structure before it is printed and manufactured. It is the technical blueprint that transforms a creative design into a physically producible package.
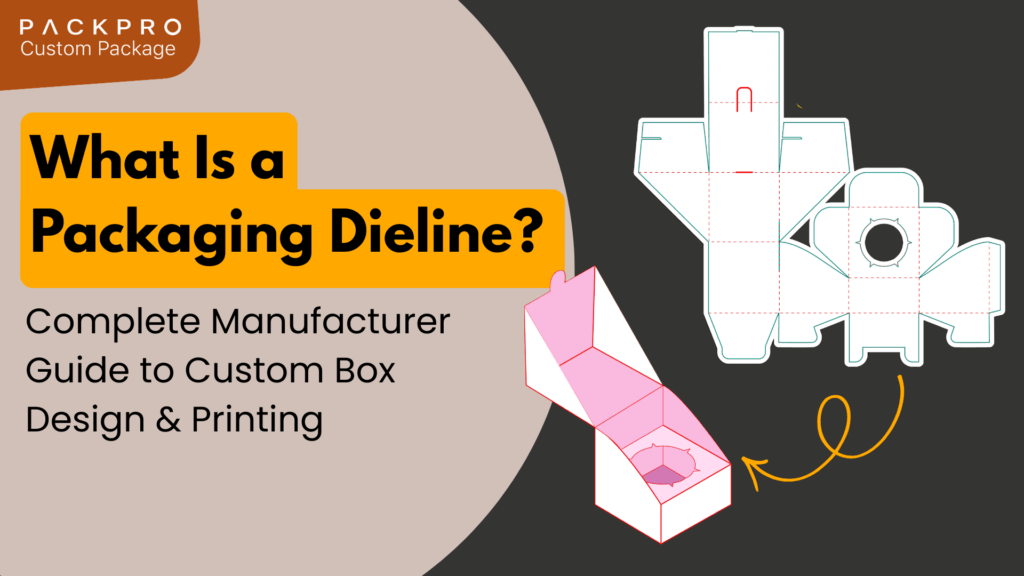
What Is a Packaging Dieline?
A dieline is a flat, scaled drawing of a packaging structure showing every element required for production: where the material will be cut, where it will be scored and folded, where adhesive will be applied, and where artwork should and should not appear. Think of it as the architectural drawing of a box, printed flat before it is assembled into its final three-dimensional form.
Dielines are typically provided as vector files in formats such as Adobe Illustrator (.ai), PDF, or EPS. They are created by the packaging manufacturer based on the confirmed product dimensions, structural style, and material specifications. The designer then uses the dieline as the template on which to place artwork, logos, typography, and graphic elements.
Key Elements of a Packaging Dieline
Every dieline contains several distinct zones and line types, each serving a specific function in the production process.
Cut lines indicate where the material will be cut through completely during die-cutting. These define the outer boundary of the unfolded package.
Fold lines, also called score lines or crease lines, show where the material will be scored to allow clean, precise folding during assembly. These lines do not cut through the material but weaken it to create an accurate fold point.
Bleed area extends beyond the cut line, typically by 3 to 5 millimetres, and ensures that background colours or images extend fully to the edge of the finished package. Without adequate bleed, minor cutting variation during production can leave visible white or unprinted margins at the edges.
Safe zone, also called the live area or keep-out zone, defines the boundary within which all critical design elements such as logos, text, and key graphics must be placed. Anything outside the safe zone risks being cut off or obscured by a fold during assembly.
Glue areas indicate where adhesive will be applied during box assembly. Designers must keep these areas free of heavy ink coverage to ensure proper adhesion.
Why the Dieline Must Come Before Design
One of the most common and costly mistakes in custom packaging is beginning the design process without a correct dieline. When designers work from rough sketches, generic templates, or their own box measurements, the resulting artwork frequently does not align with the actual production file. This leads to misaligned prints, text falling in fold zones, imagery that disappears under glue tabs, and bleed areas that are insufficient.
The correct sequence is always: confirm product dimensions first, obtain the dieline from the manufacturer second, and create all artwork within that dieline third. This sequence eliminates a significant category of pre-production errors and prevents costly reprints.
How Manufacturers Use the Dieline in Production
Once a brand has placed approved artwork onto the dieline and submitted it to the manufacturer, the file passes through several production stages. The print file is used to set up printing plates or digital print parameters. After printing, the dieline shape is used to program the die-cutting machine, which stamps out the flat box shape from the printed sheet. The cut and scored flat is then assembled by folding and gluing according to the crease lines.
For rigid boxes, the process is somewhat different. Rigid box construction uses a pre-cut greyboard shell that is wrapped in a separately printed paper, rather than die-cutting a single printed sheet into a folding structure. Even so, the wrap paper for a rigid box requires its own dieline showing how the paper folds around the box edges and corners.
Common Dieline Errors and How to Avoid Them
Insufficient bleed is among the most frequent issues. Designers unfamiliar with packaging often apply the same bleed tolerances they use for flat print work, which is typically inadequate for packaging structures with multiple folds and edges. Packaging manufacturers specify the required bleed for each structure type, and this specification must be followed precisely.
Placing critical content too close to fold lines is another recurring problem. Text or logos that sit directly on or near a score line will be distorted or hidden once the box is assembled. The safe zone on the dieline exists precisely to prevent this, and it must be respected throughout the design process.
Using an outdated or incorrect dieline version is a third common issue, particularly when product dimensions change after initial dieline creation. Any change to product size, material thickness, or box style requires a new or updated dieline before artwork can be finalised.
Obtaining the Right Dieline From Your Manufacturer
The dieline should always be provided by the manufacturer who will be producing the packaging, not sourced from a generic library or third-party template. Manufacturers create dielines based on the specific tolerances, material thicknesses, and structural configurations they use in their own production process. A dieline from a different source may have subtle differences in fold allowances or glue tab dimensions that cause assembly problems even if the outer dimensions appear correct.
When requesting a dieline, provide the confirmed internal dimensions of the product in length, width, and height, the packaging structure style, the intended material, and any special requirements such as inserts, magnetic closures, or window cutouts. The manufacturer will generate the dieline from this specification and provide it as a vector file ready for design application.